Pages

Tuesday, December 17, 2013

I am still here!

Yes, I am still here - not that my blog shows it.......life has just got rather busy of late.  Not least because I'm busy making Christmas presents so I can't really show you what I've been working on - I promise I'll show you in the New Year.  However I did rustle this up just for myself......

(Rosebuds, Resin, Flourite and Czech glass)

I wanted to try some 3D elements with resin and decided to use these rosebuds.  I've given them a coat or two of resin so they are stronger than they look.  I'm enjoying wearing it and I've had a lot of positive comments so hopefully everyone else does too.  

Monday, November 25, 2013

The Teeter Ring

My original plan for this ring was for the silver ovals to fit neatly inside each other but once I had them cut out I started playing.  I quickly decided that I preferred this fan shape - with the ovals teetering on top of each other......


Monday, November 11, 2013

The Silverdale Hoard

This weekend, I went to have a look at the Silverdale Hoard at the Lancaster City Museum.  It is a collection of Viking silver that was found in Silverdale by a metal detectorist (how exciting must that have been to find?!).  It is apparently the third largest hoard of Viking silver found in the UK and includes a variety of coins, arm rings and metal bars.  1,000 years ago a Viking must have decided to bury the silver for safe-keeping and for whatever reason wasn’t able to come back and collect it – probably an unhappy ending for them.  


The silver was all quite beautiful and I felt strangely connected to it – the person who made it clearly used techniques that we still use now.  The thing I did notice though was how thick the silver was on some of the arm bands, they must have been heavy to wear - I suspect thought that they were probably made for men (most of them would have slipped right off my arm).  


Monday, November 4, 2013

Grandad’s Silver

I bought these pretty glass cabochons and have made them into a silver bangle.  They were so pretty that I didn’t want to lose any of the pattern so I set the stones with resin rather than rubbing the bezel walls down to capture the stone as I would normally. 


You’ll probably see some writing on the inside of the bangle.  The silver is from a cup that my Grandad won for gardening.  He was an amazing gardener – anything in his care would grow tall and strong, bursting readily into flower and fruit.  Actually he was a man of many talents – he was an incredible swimmer and an excellent upholsterer - not that many people would know these things about him because he was also a man of few words.  Anyway, back to the gardening.  He won the cup at his local gardening club so often that they eventually just gave it to him outright.  The cup sat at the back of a cupboard for many years (as you can tell by the tarnish on it - see below).  I’d heard about the cup but never seen it until my mum rang to say that she thought Grandad would want me to use the silver.  I did have mixed feelings about breaking up his cup - though I do like the idea that Grandad is still supporting me, as he always did. 


I’ve been using the silver from the cup for a while now - everything made in silver that you’ll see on this blog from October 2012 has been made from Grandad’s Silver – and there is still some left.  It has been a real gift, allowing me to try many things that I might not have done had I been worried about paying for the silver!  I particularly like using the parts of the cup with writing on, as in this bangle – it reminds me of where the silver has come from.  The parts of the cup with Grandad’s name on are particularly precious and are reserved for special pieces.  

Friday, October 18, 2013

Experimenting again....

I've been experimenting again - well I am a scientist by training so that is hardly surprising.  I mentioned in the Autumn Design Challenge that I've been trying out some Pebeo paints and mixing those with resin.  The paints are lovely.....completely unpredictable but you get some gorgeous honeycomb-like effects, which develop over an hour or so.  It is fun to watch how the colours mix and interact.  Here are a few examples......


....and here is one made up into a necklace.....


Sunday, October 6, 2013

Boot Camp - hoops

It is time for Boot Camp again - and this time it is all about hoops.  I don't know about you but when I think hoops, I automatically think earrings.  But I have a confession for you - I make jewellery but I don't have pierced ears.  People have looked at me incredulously about this for a while now but I've just never fancied having them done - plus I'm a bit of a baby about pain!!  I decided to make a pendant instead.

I made three silver hoops and textured two with different hammers and left one untextured.  Then I soldered them all together at the top.  While digging around in my scrap silver pot I came up with a perfect curled piece of silver that I'd chopped off a bezel I was making.  I soldered that at the top together with a silver ball (love making those!).  I also made a toggle clasp and then pulled everything together with some prehnite beads and a few black tourmaline rough stones.


I hope that you like the necklace.  Please go and have a look at everyone else's take on hoops - there is sure to be some interesting and inspiring work on show.

Wednesday, October 2, 2013

Autumn Design Challenge

I was lucky enough to be chosen by Lesley and Caroline for their Autumn Design Challenge - have a look at the goodies that they sent me!

I started up with the Caroline's bird bead.  I wanted to find a perch for it and tried a few things - but I eventually decided on this wooden bead that came as part of a pack from Smitten Beads.  I decided to make some resin components - incorporating skeleton leaves.  Then I pulled out some Czech glass beads that had a frosty, autumnal feeling and put these together with the round beads from Caroline.  It got finished off with some peanut beads......


I've been experimenting with some Pebeo effects paints and mixing those with resin.  You get some interesting honeycomb effects - the end result is entirely unpredictable...it is quite exciting watching this paint dry!!  I picked some complementary paint/resin colours to Lesley's flower pendant - and some extra components for the necklace.  Again it is finished off with some peanut beads (I'm a little obsessed at the moment!)....


I've been making quite a few of these wire 'cocoon' beads lately - I make these on a coiling Gizmo.  So I made a couple more and matched them with Lesley's bracelet focal.....


The last thing I made was a bangle using Caroline's heart bead as a dangle.  I made the bangle in wire and then tightly wound on some sari silk.  I wire wrapped this adding a few seed beads for some extra sparkle.  I think I might make a few more of these - I think they'd be fun to stack up on my wrist......


I really enjoyed working with Caroline and Lesley's art beads.  Please do go and check out their work for yourself.  Lesley is at  http://thegossipinggoddess.blogspot.co.uk/ and Caroline is at http://blueberribeads.co.uk/.  Please also go and have a look at what everyone else made with the beads that they were sent for the challenge....


Caroline Dewison – http://blueberribeads.co.uk


Melissa Trudinger – http://beadrecipes.wordpress.com/


Madeline Bunyan – http://madelinebunyan.com/mlj/


Tuesday, September 24, 2013

Swap!

My friend Denise makes the most amazing Georgian dresses.  Actually she does all sorts of creative things - bookbinding, wood-carving, jewellery-making.......  She really liked a necklace that I made for boot camp so we decided to swap - I'd make her a necklace and she would make me a Jane Austen-style dress.  We both recently went to Bath for the Jane Austen festival so my new dress got its first outing then....


It was a rather wonderful experience parading through Bath in my dress....and also a little disconcerting every time I looked round someone was taking my photograph!

For my side of the swap, I swiftly got coiling and this is the necklace that I made for Denise......


If you want to see more of Denise's fabulous dresses (plus lots of other things) please go and have a look at her website - http://www.austensiblyausten.co.uk/.

And if you want to see more of us at the Jane Austen festival go and have a look this film made by my friend Janine of Gorgeous Media......what talented friends I have!!  

Wednesday, September 18, 2013

Capturing Summer

We're definitely feeling the first blast of Autumn here in the UK.....so to remind me of long, warm days and flower-scented nights, I've captured this rose bud in a sphere of resin.  


I've paired it with some golden rutile quartz beads - I had a rummage through my bead stash and these beads seemed to work the best.


Monday, September 9, 2013

Pink and Sparkly

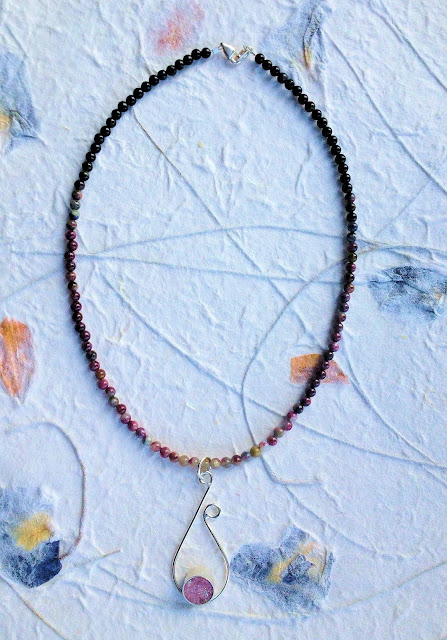
I don't normally do pink and sparkly but I got seduced by this Druzy cabochon.  It has a lovely sparkle to it which is hard to capture in a photo....


I decided to set it into silver and came up with this shape by putting the Druzy onto a piece of paper and doodling.  This is the shape that I liked best.  


I finished off the piece by adding some tourmaline beads.  Pink, delicate and sparkly - so not me, but I'm rather pleased with it!

Wednesday, September 4, 2013

Autumn Design Challenge

Hooray!  I got chosen to be part of the Autumn Design Challenge organised by Lesley from the The Gossiping Goddess and Caroline from Blueberri Beads.  These ladies are very talented - go and have a look at their work.  For this challenge, they have put together a set of beads and sent them out to all the participants.  This is what they sent me......


Caroline has sent a set of her ceramic beads.  I love these, particularly the purple bird bead - I think that I'm going to have to find it a nest or a branch to sit on!  Lesley has sent a bronze flower pendant with a gorgeous enamelled centre and a bronze bracelet focal with a lovely patina.  I've got lots of ideas about how to use these (probably too many ideas!) but you'll have to wait until the reveal day on October 2nd to see what I do.  Please come back then!  

Thursday, August 29, 2013

Nostalgia

When I was little I was a big fan of pressing flowers.  My Dad recently showed me a pressed flower bookmark that I'd made him for Father's Day when I was 7 or 8.  A relative made me the flower press - I still have it - but I'm ashamed to say I've forgotten who it was.  They also made a Fort for my brothers.  

UPDATE!  Ooops it turns out that my Mum designed my flower press and my Dad made it for me.  My Dad's Uncle Albert did indeed make the Fort for my brothers but he made me a doll's house.  It obviously got mixed up in my mind over the years!  Sorry Mum and Dad!!

The Hydrangea bush in my garden is looking great this year so I thought that I'd go back to my old habit of pressing flowers.  Once they were pressed, I encased them in resin and made one into a light, simple necklace.  I think I might try doing this again......


Monday, August 19, 2013

Cocoon Bracelet

I'm still enjoying my new Coiling Gizmo.  It makes coiling much faster - and makes neater coils that I could achieve by hand.  However you do have to keep an eye on it - it is easy to get distracted and then look down and realise that the coil has started back on itself.  This is easy to fix - just unwind it and carry on coiling.  However, as an experiment, I thought I'd see what happened if I carried on letting the coil go back on itself.  I coiled back and forth until it started to look like a cocoon and then I coiled on a few seed beads for a contrast in colour.  I was so pleased with the result that I made two more 'beads' and strung them together into a bracelet for myself.  Of course this experiment meant that I got completely distracted and didn't finish the piece that I was intending to do but I'm pleased with my new bracelet!  


Monday, August 12, 2013

Boot Camp

It is time for Boot Camp again and this time it is all about clasps.  Last time I showed you some coiling work that I'd done with the Coiling Gizmo - and I wondered if I could make a clasp with these coiled components.  The answer is yes!  I've made a series of coiled links, incorporating some glass beads for some added interest.  I've paired this with a resin leaf that I made some time ago - it has been sitting in my 'to be completed' pile for a while now and it is good to find it a home!


Here is a close-up on the clasp since this is what Boot Camp is all about........................


Please go and have a look at what everyone else has been making for boot camp - there is always beautiful  and varied work on show.  

Wednesday, August 7, 2013

Beyond Excited

I am very excited because my work is in this month’s Beads and Beyond – my favourite jewellery-making magazine!! Back in the summer, Beads and Beyond announced on their blog that they were opening up their Designer Challenge to their readers for one month only. In case you don’t know, the Designer Challenge is where they send out the same package of beads to four designers and challenge them to make jewellery with them. I thought I would apply and was thrilled when they chose me. The beads arrived by recorded delivery early in June - as well as a brief on what to write about. The copy date for the magazine to receive my jewellery and text back was the end of June so I was busy getting everything finished. I had a strict word count for my descriptions about how to make the jewellery (120 words) – which was a really fun challenge – I think my first draft was closer to 400 words each so I had to slim my descriptions down rather!


It has been a complete joy working with Beads and Beyond – I am so happy to have been part of the Designer Challenge. Please go and buy the magazine to see what I made – it is the September 2013 edition which will be available in the shops on the 8th August..........I'm on page 68!

Monday, July 29, 2013

Flourite pendant

I bought this gorgeous Flourite cabochon.  It really is lovely - lots of bands of colour running through the whole stone.  I wanted the stone to be the main focus so I kept the silver setting simple.  There is not much silver at all - I even cut out the back to let the light flood through the stone and show off those bands of colour.  


Monday, July 22, 2013

Pewter

At the weekend I went to a Pewter workshop with Ella McIntosh in Manchester at the Craft and Design Centre.  It was a revelation - I really enjoyed working with Pewter.  A lot of my silversmithing skills did still apply but there were some differences too.  Pewter melts at a much lower temperature than silver so I did end up with a few 'Pewter puddles' until I got used to how much heat I could use - however it does mean that you need a smaller torch (I think it would be more practical to use this smaller torch in my house).  Other advantages are that Pewter doesn't tarnish - and it is also a lot cheaper to buy than Silver.  We were making Pewter beakers during the workshop - here is the one that I made.....


I was pleased with how it came out - particularly because it is the largest metal-working challenge that I've taken on.

Tuesday, July 16, 2013

Shimmering leaves


I made the silver leaf and branch with silver and then filled them with resin and mother of pearl.  I wasn’t sure how this would work – I thought the mother of pearl might be too subtle up against the neckline.  However, I really like the effect – it really shimmers when it catches the light.  I was so pleased with it that I decided to make a matching clasp.  To finish it off, I found a mixed quartz strand and the colours worked perfectly.  

Wednesday, July 3, 2013

Sometimes it is good to make mistakes!

Recently, I was throwing a pot on the wheel and really messed up the top.  I chopped the top off and shaped the clay that was left into a rather average small bowl.  I started playing with the rim of the pot and hit upon this wavy edge which I thought had some potential.  So, rather than recycle it into useable clay again, I decided to fire it.

I was rather pleased with the result and decided to do the same again - intentionally this time!!


Tuesday, June 25, 2013

Quail's egg necklace

I really liked how my previous quail's egg necklace had come out so I decided to strengthen another quail's egg with resin and see if I could set it in silver.....and I could!........

(Sterling Silver, resin, quail's egg)

I kept the setting simple because I just wanted to see how it would work - I may try again and make something more elaborate.  I do like to have something to fiddle with and eggs have such a pleasing shape and texture - I'm loving having one around my neck to play with while I'm mulling something over!  


In unrelated news, Barbara has written a post about her favourite pieces from this month's Love My Art Jewelry Boot Camp.....and I got a mention!  Thanks Barbara!!

Monday, June 17, 2013

Boot Camp 3

This time Boot Camp was all about wire work. Coincidently, I made an impulse purchase of a Coiling Gizmo a week before Boot Camp was announced so I decided to put my new toy through its paces for this challenge.........and I love it!  I've been coiling like a demented person ever since!!  Here is what I came up with.....


I was experimenting with coiling different colours of copper wire together and came up with the links at the bottom which I really liked - they have an almost ancient Egyptian feel to them (for me anyway) so I made the rest of the necklace to fit in with that theme.  It is mostly all wire, with a few Czech Glass beads thrown into the mix.
Please go and have a look at what other people have made for this boot camp - I'm always amazed at the creativity shown in these challenges.  Thanks to folks from the Love my Art Jewelry blog for organising this fun challenge.

Wednesday, May 29, 2013

The ‘What came first’ Necklace

I spotted some quail’s eggs in the supermarket.  They did make a nice little snack but really I bought them because they were so pretty and I wanted to see if I could use them in jewellery. 


I have strengthened the egg with resin so it is a lot stronger than it looks but I do like the apparent fragility of the necklace.  I have some dyed howlite bird beads and these seemed a good match so I’ve included one of these in the necklace together with some seed beads. 


What came first; the quail or the egg?  

Friday, May 24, 2013

Bluebell Woods

My lunchtime ritual is to go for a walk in the woods near where I work.  My job is desk-based and I could easily spend the entire day sitting down if I didn't do this.  I haven't been able to walk for a while though after injuring my ankle in spectacular fashion in February.  However, today I went for a walk in 'my' woods.  This was under orders from my physiotherapist who thought that the uneven ground would 'stress my foot' (which is a good thing apparently!).  It was perfect timing - the bluebells are out and the scent was amazing.  


These walks are important to me - particularly when I'm thinking up a jewellery design - so it was great to get out there again.  I’m not one of those people that can sit down with a piece of paper and come up with a design.  I just go for a walk in the woods and an idea pops into my head - or not as the case may be, but at least I’ve had some fresh air!!  

I have been busy making things but I seem to be using a scatter-gun approach at the moment - I've started lots of things and, consequently, haven't finished anything!  Hopefully my walk will clear my head and I'll have lots to show you in the next few weeks.  

Friday, May 10, 2013

Eat, Drink and be Merry

I haven’t shown you any of my thrown pots for a while.  I’ve been throwing a new shape (for me at least) on the wheel – a goblet/chalice shape.  Each one is coming out slightly differently as my hands learn how to throw this shape.   They seem to be getting bigger and bigger though – it will be a very merry night if you drink from some of the more recent ones!   Or perhaps they could be egg cups if you like Ostrich eggs for breakfast!!


Tuesday, April 30, 2013

Art Bead Scene April Challenge

A couple of weeks ago I showed you my interpretation of Monet's "Walk in the Meadows at Argenteuil" which was the work of art chosen for Art Bead Scene's April Challenge.  Art Bead Scene has a blog tour at the end of the month so we can all see what everyone has been making.  Please go and have a look - there are some breathtakingly gorgeous interpretations of the painting.  

Here is my necklace again in case you missed it.....


Saturday, April 27, 2013

Bead Soup

Hooray, it is my reveal day for Bead Soup.  Jò sent me a lovely selection of goodies to work with.  There are some more detailed photos in my earlier blog entry but here is quick recap.....


I started by taking a few of the smaller elements from my soup ingredients and making them into a focal.

There were two bead caps that reminded me of the centre of flowers so I took some of the resin fragments that I blogged about a few weeks ago and made a daisy with the bead cap at the centre.  I paired this with the mother of pearl beads from my Bead Soup ingredients and some seed beads from my stash….


Next I took the leaf and branch charm and filled this with resin and tissue paper. I’ve paired this with some seed beads from my stash and some of the frosted glass beads and another leaf charm that Jò sent.....


Jò told me that she didn’t like working with the colour orange – and fortunately, the bead soup that I sent her didn’t have any orange in it.  To be honest, when I looked in my stash I couldn't find many orange beads either  so I guess I have the same issue with orange as Jò.  Therefore I thought, as one of the aims of Bead Soup is to expand your horizons, I should take it as a challenge to make something with orange beads.  I’ve made this bracelet with the few orange beads I found in my stash (and some creamy brown leaf beads to calm it down a bit!).  From my Bead Soup ingredients, I used some of the bead caps, a leaf charm and the small frosted orange beads that Jò sent….


I’ve had it in my mind for a while to make some resin pieces with some 3D elements.  
Jò included some teeny-tiny bead caps and these gave me the perfect opportunity to try this idea out.  I embedded the bead caps in some of the resin and skeleton leaf components that I blogged about a couple of weeks ago.  I added some coloured resin in the centre to make a centre for the flower.....


and here is the completed piece……


Next I worked with the copper fold-formed focal that Jò sent me as a gift (as if her Bead Soup wasn't generous enough!!).  I made a macrame bracelet for this with some of the glass and silver beads from my soup ingredients....  


And last but not least – how did I use the focal and clasp from my soup ingredients?  I recently did a waxed linen cord knotting class with the very talented Rebecca Anderson over at the Manchester Bead Shop and I wanted to use what I’d learnt in that class.  I went all-in with this one and made a full-on girly confection!!  I paired glass beads from my stash, with the focal, clasp and silver beads from my soup ingredients....    


It has been really fun working with everything that Jò sent.  I was very lucky to be partnered with her!  I really enjoyed the challenge of using ingredients that I hadn’t worked with before.  Please head over to ’s blog to see what she made with the ingredients that I sent her.  And please also go and see what the other bead soup participants made – there is some lovely work out there. 

A final word to Lori Anderson – the hostess of the Bead Soup Blog Party.  I am amazed at the work that she puts into this.  Thanks very much Lori – I’ve really enjoyed your party!!